Remembering and understanding facts are important first steps in science, but how often do students climb from the doldrums of remembering to the soaring heights of evaluation in Bloom’s Taxonomy?
We’re going to use life cycles and biomes as examples of how to move students towards “evaluation” using these scaffolded steps:
- List the advantages and disadvantages of each option
- Group these details into categories
- Select winners within categories
- Pick the overall winner
- Determine when the winner would actually be a bad choice
- Bonus: Create a new option
Here are some worksheets to help you implement these ideas.
Now, it’s true that this will take longer than following a textbook, but we’re not just teaching science facts, we’re equipping students to make well-informed judgments. And, to take our students deeper, there’s simply no substitute for time.
Case Study: Life Cycles

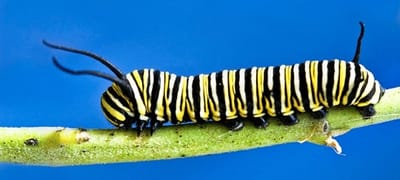
Photo by Aussiegall
Content: Students learn that life cycles vary depending on the animal, including butterflies, frogs, and mice. Students are going to evaluate those life cycles and make a decision, but not until they’ve carefully examined the evidence.
1. Advantages and Disadvantages
First, students list the advantages and disadvantages of the three life cycles. We want to force kids to consider content from multiple perspectives before making their judgment. Opening with a discussion of open minds might be helpful:
I know some of you love frogs or love butterflies, but we want to keep our minds open and evaluate the positives and negatives of all the options before we make a choice.
I’d keep this limited to three options to avoid overwhelming students. The more varied the options are, the better.
Sample answers:
| Frogs | |
|---|---|
| Advantages | Disadvantages |
| Tadpoles don’t eat the same food as adults. | Eggs need water |
| Tadpoles can survive without adults. | Eggs are vulnerable |
| Tadpoles have no protection | |
| Butterflies | |
|---|---|
| Advantages | Disadvantages |
| Caterpillars have many defenses | Eggs are vulnerable |
| Caterpillars can survive without parents | Pupas are vulnerable |
| Caterpillars eat different food than adults butterflies | |
| Mice | |
|---|---|
| Advantages | Disadvantages |
| Adult mice protect baby mice | Baby mice need adults to find food |
| No mice eggs are left out | Baby mice eat the same food as adults |
| Mothers must be protected when pregnant | |
This first step may take an entire science period (or more), but we’re setting the stage for well-informed judgments. And note about how differently they’re already thinking about the content.
2. Grouping The Characteristics
Now, students group the advantages and disadvantages into categories of their choosing. This is an example of inductive thinking – one of my favorite techniques for differentiating.
Let kids come up with their own categories, but you can scaffold this by giving an example category to get the ball rolling.
| Categories | ||
|---|---|---|
| Safety of Young | Competing With Adults For Food | Involvement of Parents |
| Tadpoles have no defenses. | Tadpoles and caterpillars don’t compete with adults | Mice mothers must carry young |
| Frog and caterpillar eggs are defenseless | Baby mice compete with adults for food | Mice parents must care for their young |
| Caterpillars have defenses | Butterflies and frogs do not care for their young | |
| Caterpillars are vulnerable while in pupa phase | ||
| Young mice require parent protection | ||
Perhaps students did not consider whether young mice are kept safe or not. Encourage them to notice if they’re missing information such as this. Push them to think about each topic from each perspective.
3. Making Judgements
At this point, we can ask students to pick the best option from each category.
| Winners | ||
|---|---|---|
| Safety of Young | Competing With Adults For Food | Involvement of Parents |
| Mice | Frogs and butterflies | Mice |
| Young mice are the safest because their parents stay with them. They aren’t left alone as eggs. | Tadpoles and caterpillars eat different food than adults, keeping them safer. | Mice parents are the only ones that look after their young. |
Look at how deeply students are digging into this topic compared to just “knowing that life cycles are different.” They are judging with criteria!
4. Overall Decision
Finally! Students get to make the big decision: which is the best overall and why? As a mammal, myself, I’d have to pick mice!
5. But When Would It Be The Worst?
Once they’ve decided, add a bit of complexity by switching up the criteria. Ask, “When would your best choice be the worst choice?”
I would have to admit that, if a young mouse’s parents are missing, the mouse cannot find food on its own, making it the worst choice. We’re exposing students to the idea of context and criteria here. Even if an idea is best overall, there are situations where it is actually the worst choice.
6. Create Your Own
Students have carefully investigated and evaluated the life cycles of three animals. If you’ve got the time, give them one final push up Bloom’s Taxonomy to “creation” or, as I like to think of it, Synthesize.
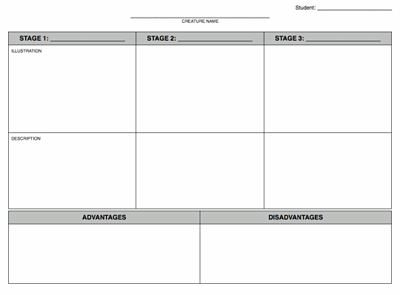
We’ve examined the positives and negatives of life cycles. Now I want you to create your own creature that goes through at least a three stage lifecycle. You’ll have to make some trade-offs, so be aware of the positives and negatives of your creature.
Here’s a sample worksheet you might use for life-cycle evaluation:

Another Case Study: Biomes

Photo by Wallygrom
The same steps will work with students who are studying biomes.
- List the advantages and disadvantages of each biome (limit the number of options to three).
- Put these details into categories that they create (perhaps: temperature, moisture, plant-life, and animal-life).
- Pick winners in each category.
- Determine an overall winner.
- Note contexts in which the winner is not the best (the ocean biome would not be best if you are a fox).
- Develop a new biome, with its own positives and negatives.
Further Thinking
These steps are flexible and easily apply to many topics within science as well as to other content areas. Building up this evaluation lends itself nicely to high-level assessment as well.
And, again, here are those worksheets to help you get this going in your classroom.
