Does oral language instruction get the short straw in your language arts program?
I found that those little standards labeled Speaking And Listening easily slip by the wayside when practicing more easily tested material. And yet, is there any skill more important in landing a job, surviving social engagements, or being a successful leader than confident speaking skills? And is there anything that strikes terror in the heart of us all than having to get up and give a talk?
One year, I decided to really make a go at helping my students become better and more confident speakers. Here’s what I ended up with.
This article embeds some elements of Depth and Complexity. If you’re not familiar, read up on them or just ignore the icons!
Opening With A Generalization
I’m setting this up as a deductive lesson in which we begin with a 🏠 Big Idea and then work towards smaller 🌻 examples. Here’s the generalization I’d start off with: Verbal and non-verbal patterns come together to create a powerful public speaker.
As we move through the unit, we’ll constantly come back to this big idea. Deductive lessons are a great technique for designing differentiated learning experiences. Want to know more about deductive lessons?
1. Introduce Verbal & Non-Verbal Patterns
First, explain the 👄 vocabulary: verbal and non-verbal.
- Verbal elements include rate of speech, pitch, volume, tone, repetition, etc. Act out these elements to show how things like rate, pitch, and volume differ.
- Non-verbal elements include hand gestures, body movement, use of imagery and realia, technology, etc.
Bring students back to that 🏠 generalization. A great speaker purposefully incorporates verbal and non-verbal elements.
Note: one year I also incorporated a “technology” pattern in addition to verbal and non-verbal so that we could discuss how folks use their slides, audio, clickers, etc.
2. Identify and Analyze These Patterns Using A Video
Next, show a video of an amazing speaker. Now, I’d be eager to jump straight to Martin Luther King or John F. Kennedy, but instead, I started with something closer to my students’ hearts: Apple CEO Steve Jobs’ announcment of the iPhone (Update: this was originally written in 2009, so perhaps there’s a more modern equivalent you’d use).
- Select specific parts of the video to watch (it’s pretty long and some parts are too technical).
- Have students watch for Jobs’ use of verbal and non-verbal traits that make him an interesting, effective speaker.
- Students should create some sort of graphic organizer to keep track of specific examples.
- Finally, engage in a discussion of the patterns they found.
I’d create a community graphic organizer as we went. Here’s a sample (a Tree Map, if you’re a Thinking Maps person) showing Jobs’ speaking skills:

I spread this out over a few days. We’d watch a minute or two, discuss, update the organizer, and then keep coming back to it.
3. Reinforcing The Generalization
Over the next days, bring in a second and third video. Go ahead and watch a classic speech from a political or social leader.
- Martin Luther King’s I Have A Dream speech
- John F. Kennedy’s Inaugural Address
- Oprah Winfrey’s 2008 Stanford commencement address
- FDR’s Declaration of War on Japan
Once again, students should be looking for patterns in the speaker’s verbal and non-verbal traits and noting them on a graphic organizer.
Note: This is a chance to expose students to important or classic ideas that are beyond the scope of your curriculum.
4. Connecting The Three Speakers Together
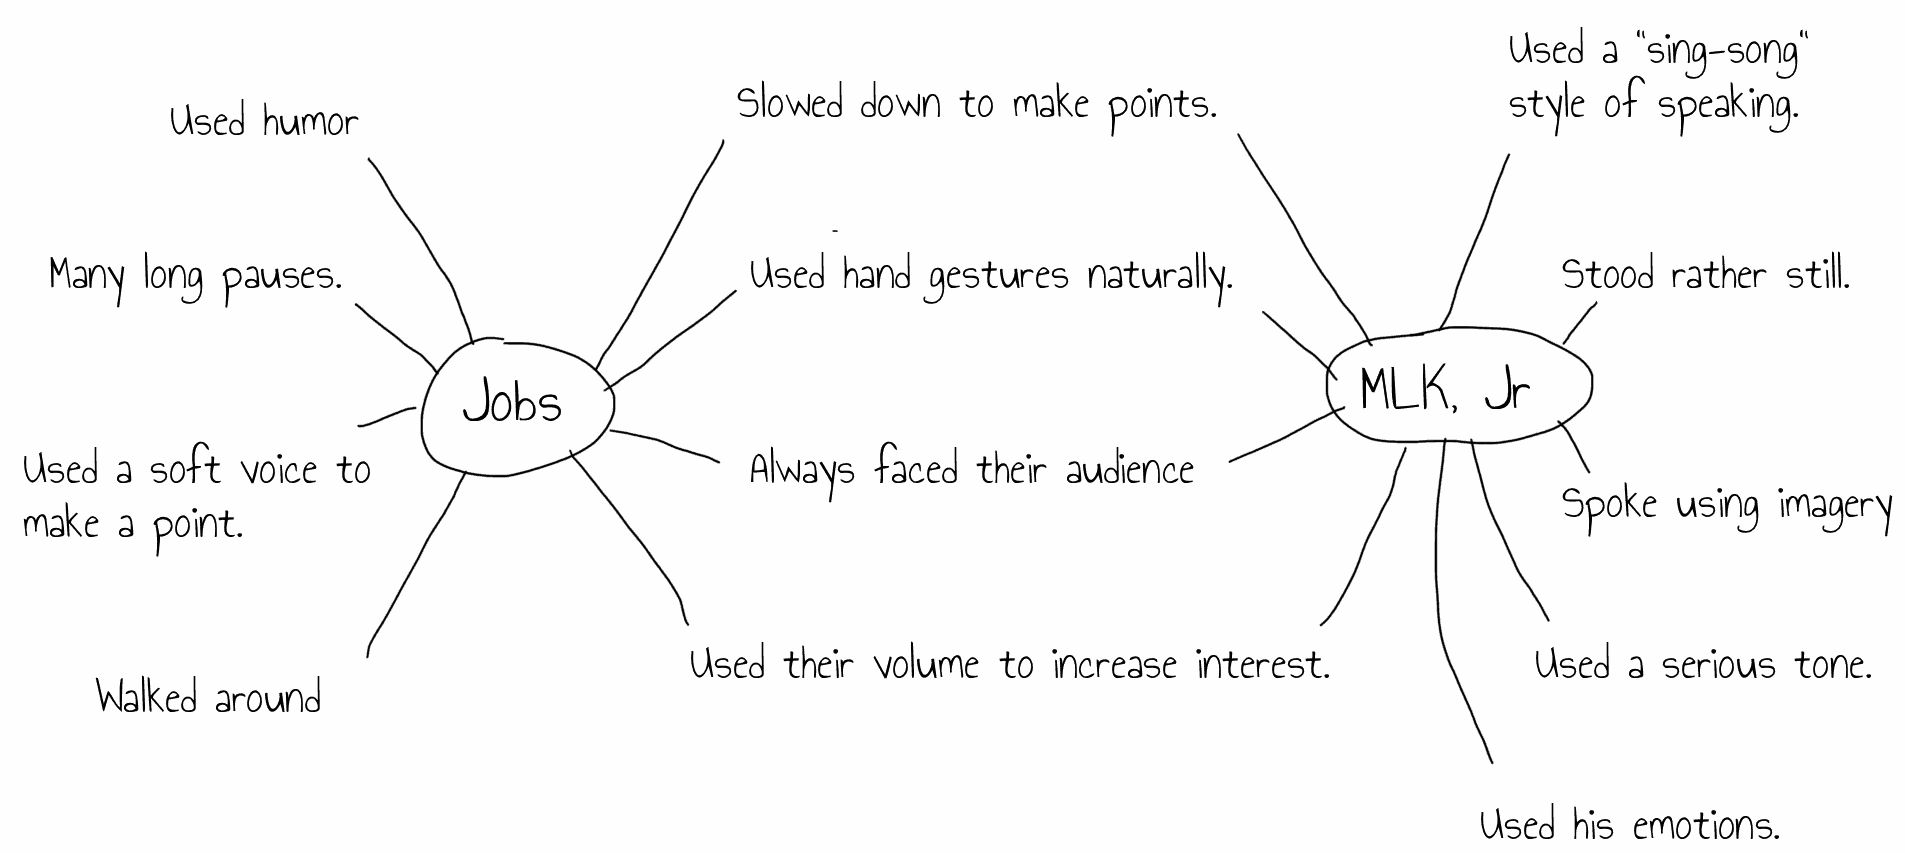
After analyzing the three speakers separately, have students look at the parallels among the speakers. How did they all use rate? How did they use their hands? A Venn Diagram or Double Bubble map will work as a graphic organizer.
Here we’re comparing and contrasting Steve Jobs and Martin Luther King:

Notice that we’re moving up Bloom’s here, from Identify to Analyze.
5. Bringing It Back To The Students
By this point, students should have a wealth of examples and are ready to start planning their own great speeches. To scaffold this process, have students select one verbal and one non-verbal element as their “focus elements.” These will be used in the next step as students work on improving small parts of their public speaking skills. Giving students this small focus worked wonders. Kids knew exactly what to practice and I knew exactly what to give them feedback on.
Once your students have picked the elements of public speaking they want to improve. Now it’s time for them to write their speech and present it.
Here was my prompt:
Your assignment is to sell me something silly, students.
As an example, I modeled a sales pitch for a dry-erase marker. The item for sale, naturally, doesn’t matter. The purpose is for students to practice their “focus elements” (from earlier in this series).
I let students pick their item, and ended up watching sales pitches for:
- Pencils
- Erasers
- Backpacks
- Even a laptop made out of paper
It was fun to see what kids came up with.
Note: No PowerPoint!
Goal Setting
Some students will get caught up in the creativity of designing a silly item to sell, so I require their verbal or non-verbal goals to be written down. I explain that their feedback is based solely on this goal.
Structure of Presentation
I set this up as a problem and solution presentation and use the oral language standards:
Speaking and Listening Anchor Standard 4 Present information, findings, and supporting evidence such that listeners can follow the line of reasoning and the organization, development, and style are appropriate to task, purpose, and audience.
Since the focus is really on individual speaking skills, I keep the structure of the speech as simple as possible:
- Describe an existing problem the audience may face.
- Show how your item solves the problem.
I’d also keep the length to a minute or two max.
The Feedback
But here’s the key. Before they get up to give their presentation, they give me a notecard with their two focus elements.
This way I know what I’m looking for as they give their talk. Some kids may be trying to speak loudly, others want to work on hand-gestures, while others might be practicing walking around.
It was a delight to spot exactly what my students wanted me to pay attention to.
Repeat It
I’d come back to this every couple weeks. I want to give students constant, small opportunities to get better at specific elements of public speaking.
For me, this work paid off years later when I received an email from a former student (now in 8th grade!) thanking me for all of the public speaking practice.
